Let's Encrypt! 〜無料でSSL化〜
背景
運用しているWebサーバを無料で、独自/常時SSL化する。
よくWordPress等のCMSが使えるマネージド型レンタルサーバを借りていれば無料でSSL化するサービスが提供されていますが、自分が借りているのは格安高性能クラウドのVultrです。SSLも自前で導入する必要があります。
Let's Encrypt!
云わずと知れた、無料で使えるSSL認証局 (Certification Authority (CA) )です。 日本語ポータルもあるのが助かりますね・・・ letsencrypt.jp
- 無料で SSL/TLS サーバ証明書を発行
- 非営利団体の ISRG (Internet Security Research Group) が運営。世界のWebを全て常時SSLにするというのが理念。大手(シスコ、Akamai、電子フロンティア財団)がスポンサーとして支援。
- ワイルドカード証明書とACME v2へ対応(2018年03月15日)
- Certbotというツールで証明書発行・更新が行える
- 証明書は有効期限が3ヶ月と短い。しかしCerbotで自動定期更新を行うことで半永久的に使えるので使用上困ることはない。
環境
普段DockerベースでWebサーバを運用しており、ベースイメージがDebian(Stretch)+Apache2を使っているので、今回はこれがターゲットです。
※いつもはUbuntuユーザーなのです。DebianでもUbuntuでも手順はあまりかわらないはず。aptつかえるし・・・
Debian + Apache2 + certbot
Dockerイメージ
使ったのは、php:7.1.24-apache-stretch です。元イメージは、debian:stretch-slim です。
certbotで証明書発行してApacheに登録
インストール
$ apt install -y certbot

$ certbot --version
certbot 0.10.2
certbotで証明書発行
- certonly で証明書発行のみ
- --webrootオプション
certbotは、webサーバーを内包していて、内容しているwebサーバを使って証明書を発行する時は、standaloneモード。使わない場合(ApacheやNginxを使う時)はwebrootモードを使用する。 - -d でドメインを指定する
-d example.com -d test.example.comのように複数指定できる。最初に記述したドメインがコモンネームになる。 - -w でドキュメントルートを指定
ドメインごとに別のドキュメントルートディレクトリを指定したいときには、-dオプションの直前に-wオプションを書く。 - --rsa-key-size 4096 で鍵長4096bitに指定
- -m で連絡用メアドを指定。(期限切アラート等が送られてくる)
certbot certonly --agree-tos --webroot --rsa-key-size 4096 -w /var/www/html -d www.hogehoge.com -m webmaster@hogehoge.com

Saving debug log to /var/log/letsencrypt/letsencrypt.log
Obtaining a new certificate
Performing the following challenges:
http-01 challenge for www.hogehoge.com
Using the webroot path /var/www/html for all unmatched domains.
Waiting for verification...
Cleaning up challenges
Generating key (4096 bits): /etc/letsencrypt/keys/0000_key-certbot.pem
Creating CSR: /etc/letsencrypt/csr/0000_csr-certbot.pem

IMPORTANT NOTES:
 - Congratulations! Your certificate and chain have been saved at
   /etc/letsencrypt/live/www.hogehoge.com/fullchain.pem. Your cert will
   expire on 2019-02-25. To obtain a new or tweaked version of this
   certificate in the future, simply run certbot again. To
   non-interactively renew *all* of your certificates, run "certbot
   renew"
 - If you lose your account credentials, you can recover through
   e-mails sent to webmaster@hogehoge.com.
 - Your account credentials have been saved in your Certbot
   configuration directory at /etc/letsencrypt. You should make a
   secure backup of this folder now. This configuration directory will
   also contain certificates and private keys obtained by Certbot so
   making regular backups of this folder is ideal.
 - If you like Certbot, please consider supporting our work by:

   Donating to ISRG / Let's Encrypt:   https://letsencrypt.org/donate
   Donating to EFF:                    https://eff.org/donate-le
/etc/letsencrypt/live/www.hogehoge.com/ 以下に鍵ファイルが生成されている。これらをWebサーバに設定する。
Apache設定
SSL設定ファイルは/etc/apache2/sites-available/default-ssl.conf これを編集する。
必要なのは以下の設定。
ServerName www.hogehoge.com
DocumentRoot /var/www/html
SSLEngine on
SSLCertificateFile /etc/letsencrypt/live/www.hogehoge.com/cert.pem
SSLCertificateKeyFile /etc/letsencrypt/live/www.hogehoge.com/privkey.pem
SSLCertificateChainFile /etc/letsencrypt/live/www.hogehoge.com/chain.pem
Apacheに設定反映させてリロードする。
$ a2enmod rewrite
Enabling module rewrite.
To activate the new configuration, you need to run:
  service apache2 restart

$ a2enmod ssl
Considering dependency setenvif for ssl:
Module setenvif already enabled
Considering dependency mime for ssl:
Module mime already enabled
Considering dependency socache_shmcb for ssl:
Enabling module socache_shmcb.
Enabling module ssl.
See /usr/share/doc/apache2/README.Debian.gz on how to configure SSL and create self-signed certificates.
To activate the new configuration, you need to run:
  service apache2 restart

$  a2ensite default-ssl.conf
Enabling site default-ssl.
To activate the new configuration, you need to run:
  service apache2 reload

$ service apache2 reload
[ ok ] Reloading Apache httpd web server: apache2.
テスト
Webブラウザでhttps://www.hogehoge.com/にアクセスしてつながるか確認。ブラウザの鍵マークが表示されればOK。
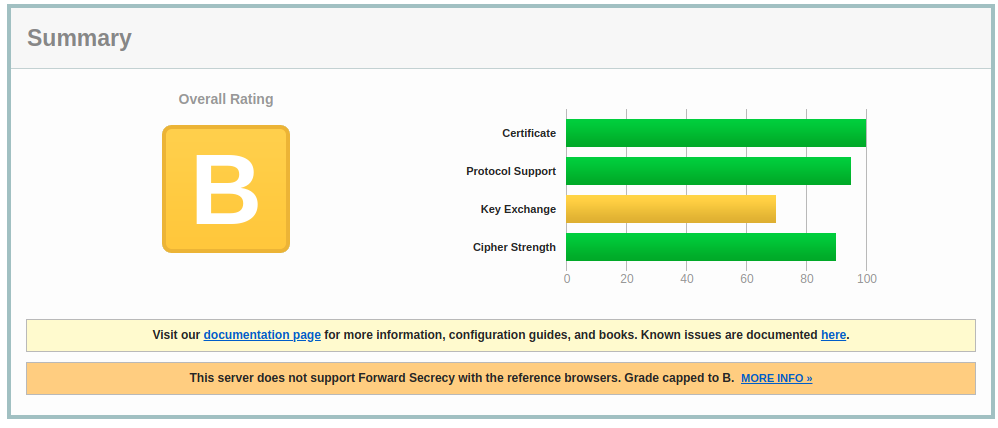
また、以下のサイトでSSL証明書のテストができるのでこれで確認する。サイトにホスト名を入力して実行する。
https://www.ssllabs.com/ssltest/
ちなみに、B判定でした。なんでだろ・・・。今日は時間ないので、あとでA判定目指そう・・・

常時SSL化
せっかくSSL対応したので、httpをhttpsにリダイレクトして常時SSL化にします。
/etc/apache2/apache2.conf を編集します。今回は / 以下すべて対象。
<Directory />
〜中略〜
    #### forword http -> https ----add start
    <IfModule mod_rewrite.c>
          RewriteEngine On
          LogLevel alert rewrite:trace3
          RewriteCond %{HTTPS} off
          RewriteRule ^(.*)$ https://%{HTTP_HOST}%{REQUEST_URI} [R,L]
    </IfModule>
    #### forword http -> https ----add end
〜中略〜
</Directory>
これで、ブラウザでアクセスして、http://www.hogehoge.com/ ⇛ https://www.hogehoge.com/ にリダイレクトされればOK。
SSL証明書自動更新
Let's Encrypt!では、証明書が90日間の期限で、期限切れの30日前から更新できます。わすれないようにcronに登録しておきます。
certbotで更新
certbot renewですべての証明書が更新される。- --post-hook "command"
で、renew後に、commandが実行される。renewは更新期限が迫らないうちは実行がスキップされる。その場合はpost-hookも実行されない。以下のように、apache2にリロードする等の使い道。 - --force-renew
更新期間外でも強制的に更新できるが、何回もやると弾かれるらしい・・・。動作確認時や鍵長変更など期限をまたずに更新したい時だけ使うようにする。
certbot renew --post-hook "service apache2 reload"
cron に登録
3ヶ月期限で、1ヶ月前から更新できるので、2ヶ月に1度の実行でよいはず。だが、ここでは、念のため1周間に1度実行するように設定する。